Showing posts with label diy. Show all posts

Pattern Matching: Kate Moss Topshop dress

Okay, so this dress is almost 10 years late (where has that 10 years gone!) but in 2007 Kate Moss released this gorgeous little black dress as part of one of her first Topshop collaborations.  I desperately wanted one at the time but as a student couldn't justify the expense (they're now around £60 second hand on ebay, so haven't lost their appeal with age).   It's the caged or harness style neckline that really makes this dress - so simple and chic.  Like a lot of her collections it's clearly based on a dress she'd worn when younger (see gratuitous Johnny Depp picture below) which she must have loved to then duplicate the design.  See even models make copies of clothes!  I came across this New Look NL6429 pattern (on sale at Jaycotts as well) and it's almost a perfect dupe, it wouldn't be too hard to make the neck 'straps' slimmer and move the placement of the middle one to allow for four straps rather than the three. 


Anyone going to give this a go, it's too good a match to ignore.....?

Fashion*2DIY4
x


Pattern Review/Hack - McCalls M6893 Skull Lace Applique Dress

Now anyone that follows me on Instagram or Twitter would've seen my many posts about a bridesmaid dress I've been making.  The only remit for the dress was that it had to be black.  As the wedding was in October I decided that I wanted a long dress to suit our British weather.  And then, of course, I played with the idea of getting skulls into it to create an 'alternative' bridesmaid dress.  Not everyone's cup of tea I know, but I was thinking more Alexander McQueen style than teenage goth. 

I decided to start with McCall's pattern M6893, using the long full skirt and bodice D for the elbow length sleeves. 


I also had a vague plan of a black skirt and a black lace top over a nude bodice but that was as far as my planning went. 

After searching around and failing to find some black lace that I really liked I decided to look into lace applique and opened a treasure trove of possibilities, there is so much out there!

I ordered an awful lot of lace applique pieces, my main choices were butterflies, flowers and yep skulls.  I also ordered some white lace appliques - like the two doves holding wedding rings  (how appropriate, right?) and dyed them black using Dylon's fabric dye for hand use in velvet black.  The instructions on the packet are super easy to use so don't be intimidated about dying your own fabric to suit your needs.

After knocking together a quick toile of the bodice piece I set about pinning the lace pieces to my mannequin to try and build up what sort of pattern I want.  This took me a long time, I'm talking weeks here, of putting some pieces on then leaving it to see how I felt about it after a couple of days.  I actually really enjoy this sort of thing, it's kind of like a puzzle trying to get all the pieces to fit together and also to follow the natural body shape.  The large skull piece on the back meant that I had to move the placement of the zip from the back to the side seam.


Then it was on to making the actual dress.  I made the bodice out of some nude satin fabric.  I ordered multiple samples to make sure I got just the right colour to suit my skin tone. 

I made the tulle overlay using double seams rather than a French seam and trimmed close to the stitching. Then I lined both top pieces up on my mannequin and pinned them together matching the bust darts and side seams.


I hand tacked every piece of applique in place onto just the tulle not the under bodice so that the top would have some movement.  Then started the long process of hand stitch each in place.  I wanted to do it by hand to make sure it was absolutely neat, stitching around the outer edge of each piece.


I even found some gorgeous lace ribbon with skulls in it to put around the bottom of each sleeve.  So pretty!  Once everything was sewn into place a trimmed away the excess tulle and any lose threads.


I had originally planned just to have a satin skirt, but with the tulle bodice I decided to add a tulle over lay skirt to bring the whole dress together.


So the fully finished dress.  I don't have any good quality full length photos at the moment as trying to take good photos in winter light is impossible.  I'll update them when the weather is more co-operative! But you get the general idea.


This was probably the biggest project I've done so far and took me a good couple of months to get finished.  Has anyone else made a bridesmaid dress or used McCalls M6893 for a project?

Update: Got a couple of photos from the big day, gives you a proper idea of the final lace effect :)


Love F*2DIY4 x
@fashiontodiyfor #fashionDIY


Pattern Review: Vogue Pattern V9021


I've been meaning to try this Vogue V9021 pattern for a while now and when I saw it was half price over on jaycotts.co.uk I finally got round to buying it. It's part of their Very Easy range so as I was at a loose end this weekend I decided to give it a go.


The sewing part only took a day, which is great because my sewing projects normally take weeks.  It was nice to have a finished dress so quickly!  There only fiddly bit in this pattern is making sure that the dart lines match up on the top and skirt when you're connecting them.  The pattern tells you to baste first which allows you to make sure that everything lines up perfectly - this was especially important with my chosen tartan fabric (I do like to make things hard for myself).

The only change I made to the pattern was to use a concealed zip instead of the standard one hidden by a fold as the pattern suggests but that's just down to my personal preference. 

Overall I'm pretty happy with the result, what do you think?


The back and hem need a bit of a press but I was too excited and couldn't wait to share this with you as it is :) 

I'd definitely recommend this pattern.  Not only is it relatively quick and easy but the shape of the sleeves are both stylish and eye catching.  I'm already planning a pattern hack with this, a chiffon version with a full circle skirt perfect for summer.

Have you made this dress up?

Love
F*2DIY4 x
@fashiontodiyfor #fashionDIY


Tutorial: How to fix your dried up gel eyeliner


Hands up who's excitedly bought a gel eyeliner after rave reviews which is now kicking about in the bottom of your makeup bag after it dried up and flaky?
 
Well all is not lost, it's actually really easy to bring your solid eyeliner back to a smooth spreadable solution.
 
You will need:
 
Your dried up eyeliner
Eyewash solution or contact lense solution
A mixing stick/Bobby pin (sterilised with boiling water)
 
 
1. Take your gel eyeliner and using your stick make a few holes in the dried up gel.
 
2. Add a few drops of whatever solution you have. I used some eyewash that I had in my medicine cupboard. DO NOT use water, it has all sorts of things in it that aren't good for your eyes - if you wear contact lenses you will probably have had this warning from your optometrist. Basically it's not sterile.

Start with just a few drops - I used 5
 
 3. Now mix together. This takes some time as the liquid will sit on top of the gel instead of just absorbing into it but persevere.
 
4. Test your eyeliner.
 
5. Keep adding a few more drops at a time and mixing until you get a consistency you like.  In the end I used 15 drops to get my gel eyeliner back to a usable state.


The line closest to my wrist is what I could just about manage to get the dried up eyeliner to do. Then I did a test line after every 5 drops and you can see how much better the final line is!  So go and fix your old eyeliner and save yourself some money :)
 
 
Please please please make sure whatever solution you use is safe for your eyes! You've only get one pair and they're delicate. An eyewash is suitable for your eyes (obviously) and I chose one suitable for use with contact lenses as they're generally gentler on eyes.


Love F*2DIY4 x
@fashiontodiyfor #fashionDIY

Fashion to DIY For's First Birthday!

 
Today is Fashion To DIY For's first birthday! And what a year its been.  There's been:
 
18 tutorials - including 4 for Oxfam Fashion
 
Thank you so much for all the follows, likes, tweets, retweets, favourites, pins, comments and page visits over the past 365 days :) It's been a great first year which wouldn't have happened without you, so have yourself some cake and keep on creating.
 
Love F*2DIY4 x
 
@fashiontodiyfor #fashionDIY


DIY: Focusing Oil Blend

Stressed out? Lots to do? Maybe it's exam time or a project deadline is looming.  You could try caffeine and sugar to get you through, but why not use something more natural.  Here's my recipe for an oil blend that will help you to relax and focus. 


Ingredients:

4oz/118ml carrier oil (I use almond sweet almond oil)
5 drops lavender essential oil
3 drops rosemary essential oil
2 drop peppermint essential oil

Lavender is great at relaxing you, Rosemary helps you to focus and Peppermint is an uplifting oil.

Simply mix all of the ingredients together and store in a bottle - glass is better than plastic if possible.  Here I've used a glass rollerball bottle for quick and easy application to my pulse points.  I always make sure I have one in my bag.  You can add a few rosemary leaves to your bottle for decoration, they should last a while as peppermint is antibacterial and the oil should preserve them a little but I wouldn't recommend leaving them in there more than a month or so - you'll be able to see if they are deteriorating.  As always be sure to test your oil on a small area of skin (your inner elbow is good) to make sure you are not allergic to any of the ingredients!

What other oil blends do you use?

Good luck with any exams, deadlines or general life stresses that you have :)

Love
F*2DIY4 x

@fashiontodiyfor #fashionDIY

Pattern Review/Hack - Amy Butler Bag

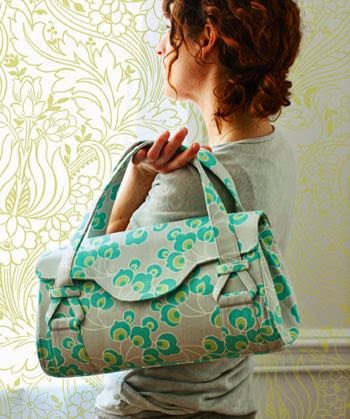
New year, New handbag.  You can never have too many handbags, in different colours, shapes, sizes, fabrics....  So why not sew your own?


This Amy Butler sewing pattern is available over on Sew Mama Sew and it's completely FREE! It even comes with two different strap lengths so you can decide which is best for you (or make both!?).

This pattern is well written and easy to follow. We made a couple of changes to the original design; we changed the shape of the flap to a curve, rather than the cut out shape of the pattern. This did mean we had to lower the 'tags' where the handles are sewn onto the bag to accommodate the new shape.

Secondly, instead of using 'Peltex' as the instructions call for, we improvised with super stiff interfacing. We used strong interfacing (as the pattern suggests) to line the majority of the pieces, but then instead of Peltex we used strong interfacing ironed onto pieces of cotton. This was far more cost effective and provides enough stability to shape the bag. To support the bottom we cut a piece of plastic and slid it in between the layers before attaching the lining to the outer bag.  You can just use a piece of cardboard for this if you don't have any suitable plastic to hand.

https://blogger.googleusercontent.com/img/b/R29vZ2xl/AVvXsEjymmnSx6Ni3Essw0asIqkLb8Nt-JiH5fzfgdwJC9NGnH4qRgUoaSOh0Utf83SBUUDaQB9Vrv8pYf4cxwQZ-VayCTtv4wAaj3Wu9czUhWWAB3cXcUxQEC9R_fLdjuk_37L0UI8uSZ1tQhXW/s1600/Aviary+Photo_130667718688968868.png


https://blogger.googleusercontent.com/img/b/R29vZ2xl/AVvXsEjtsHfZZKO-vgz9x3-nQ0Y8K1Hss9_qyOvXUP3xffBgQSKqQo1QtTtIeLK3wikaxtUba-cBW9u1qLj4LCgtkd-d2DKBkacXCLcSQyeJ1Q6J__9FbnWR5uCT-WmrT-aNJiqyO2aH0kaQzeNH/s1600/Aviary+Photo_130667730290217611.png
We chose to make the bag out of a faux suede fabric and to cover the bag flap in skull studs.  If you want to attach studs yourself its best to do this before you start sewing any of the pattern pieces together, just be sure to take the seam allowances into account when deciding on the layout of your studs.

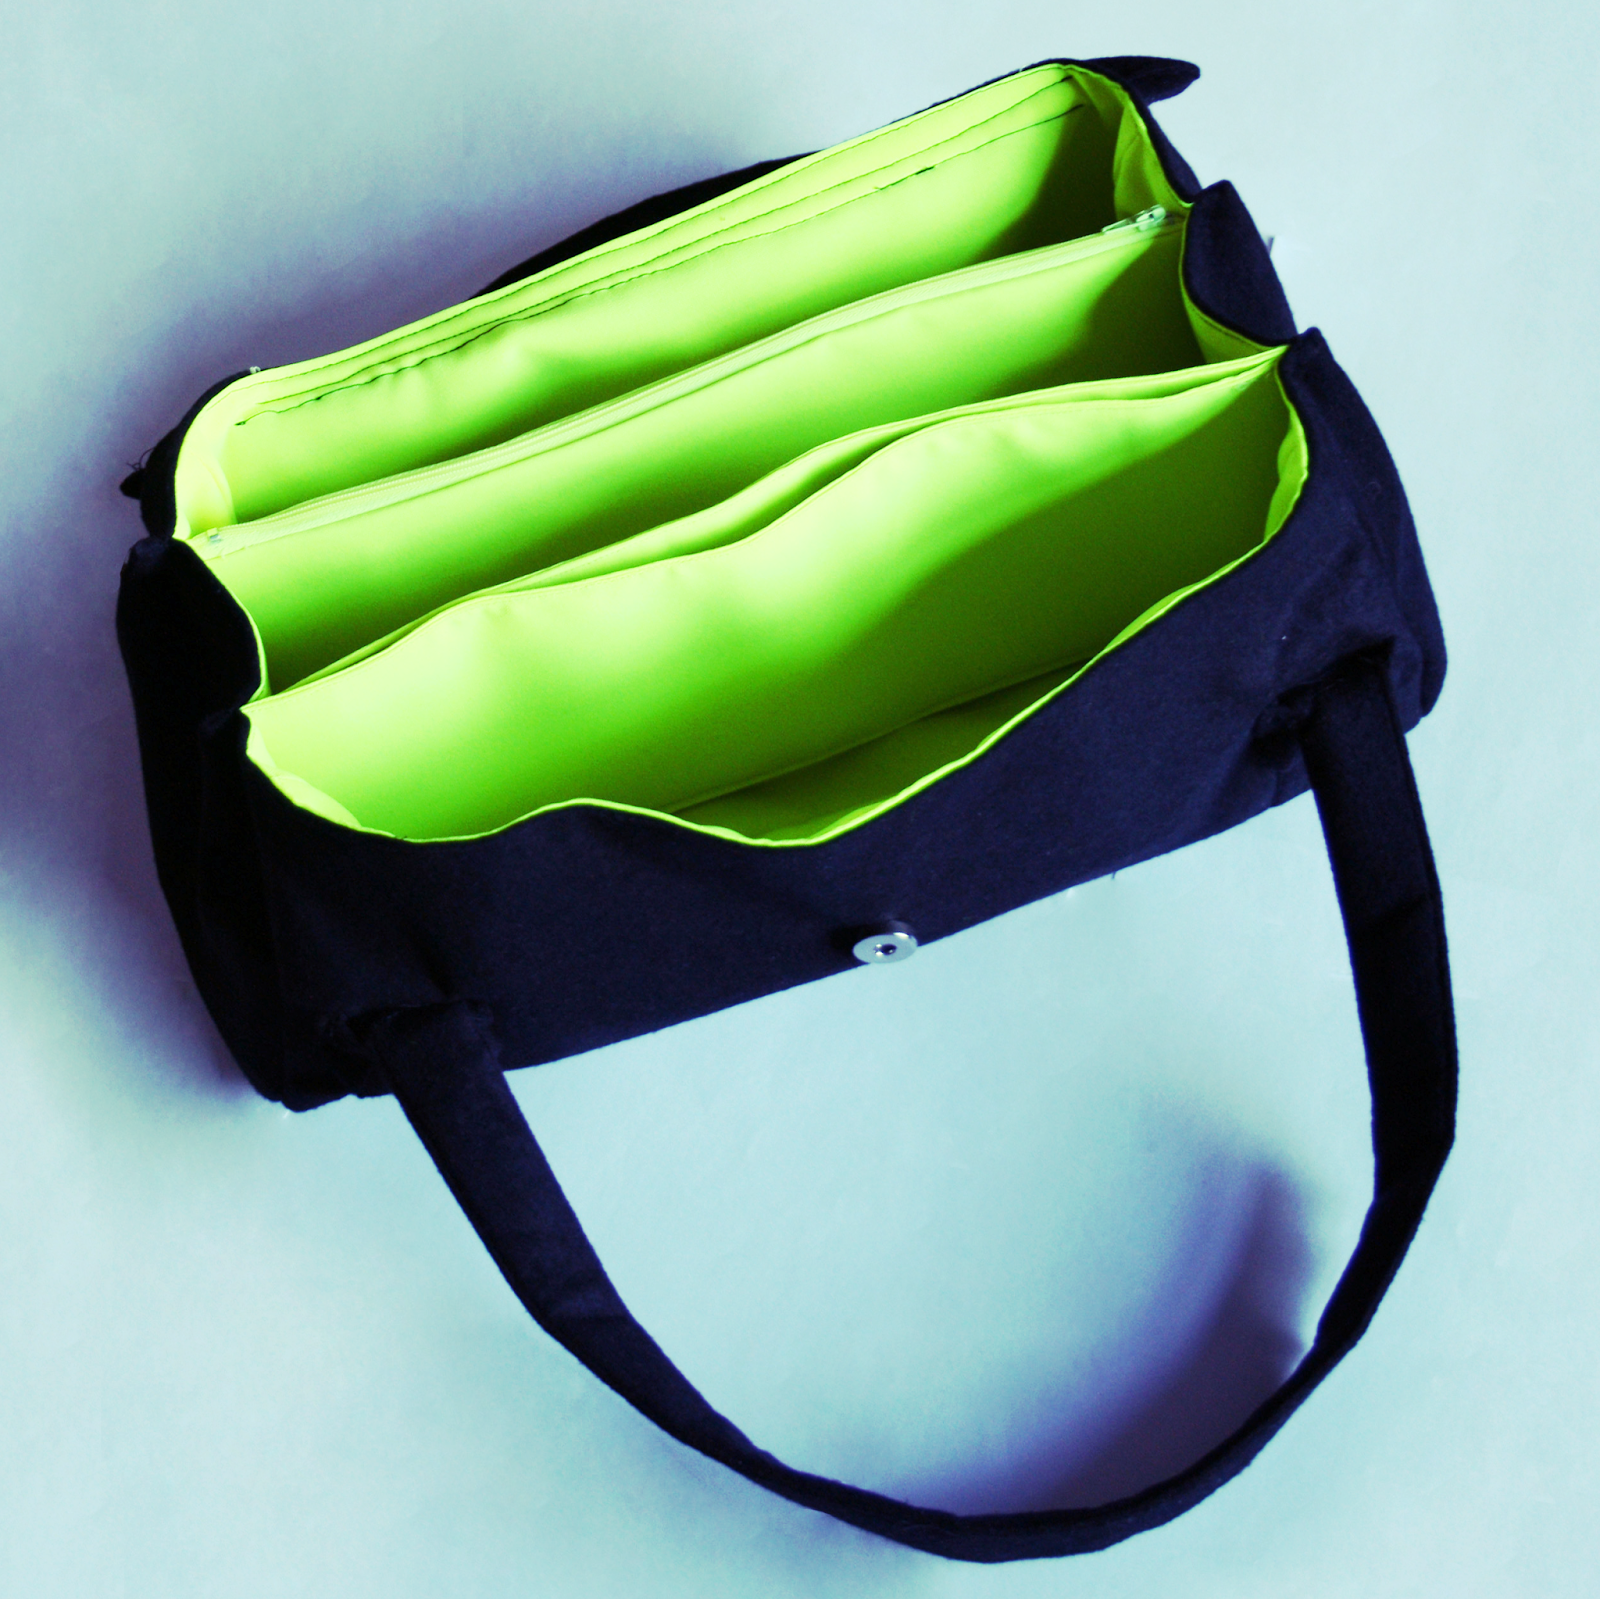
We love the inside of this bag thanks to the bold contrasting neon yellow lining and the two divider pockets, one of which has a zips.  Compartments are key to a great bag and this pattern has it right.

You will need a needle that is able to cope with thick fabrics once all the layers are built up especially when attaching the flap to the main bag.  Also we decided to hand stich the final gathers in the side as it simply wouldn't fit under the sewing machine foot!

The possibilities of adapting this pattern make it essential to your fashion DIY collection.  Especially as it's free, you have nothing to lose!

We'd love to see any bags you've made yourself.

Love
F*2DIY4 x
@fashiontodiyfor #fashionDIY

DIY: Honey Oat Body Scrub


At this time of year it's not unusual to start (or at least plan to start) taking better care of ourselves.  Weight loss, healthy eating and diet plans are all common New Years resolutions. But what about taking care of the outside of your body and removing all the crap that you come into contact with everyday? After all your skin is the biggest organ in your body!
 
Your store bought health and beauty products are packed with chemicals and compounds. Why not try a more natural approach to your outside as well as your inside?  We've been testing out some all natural DIY beauty remedies over the past couple of weeks and will be sharing the best recipes from our trial.
 
And to start you off here's a super quick and easy nourishing body scrub that you can make from items that you'll probably already have in you kitchen!
 
Honey Oat Body Scrub

Ingredients:
1 Cup coconut milk
1/2 Cup lightly ground rolled oats
1 tbsp honey
 
To make: Simply mix all ingredients together into a paste and you're ready to go.

To use: Take into the shower with you and rub all over dampened skin.  Leave to sit for a few minutes as the shower steams your skin.  Rinse off.

This recipe should make enough for 3-4 uses. Store in an air tight container in the fridge between uses.


All three ingredients are great natural moisturizers and oats also act as a gentle yet effective exfoliator.  In fact, oats also have anti-inflammatory properties and contain natural cleansers so they're pretty fantastic without a chemical in sight! Perfect :)

Let us know how you get on with your natural body scrub and we'll have more natural beauty DIY's on the way.

Love
F*2DIY4 x
@fashiontodiyfor #fashionDIY

Instagram - November Round Up

Here's a quick round up of our Instagram feed for November: 


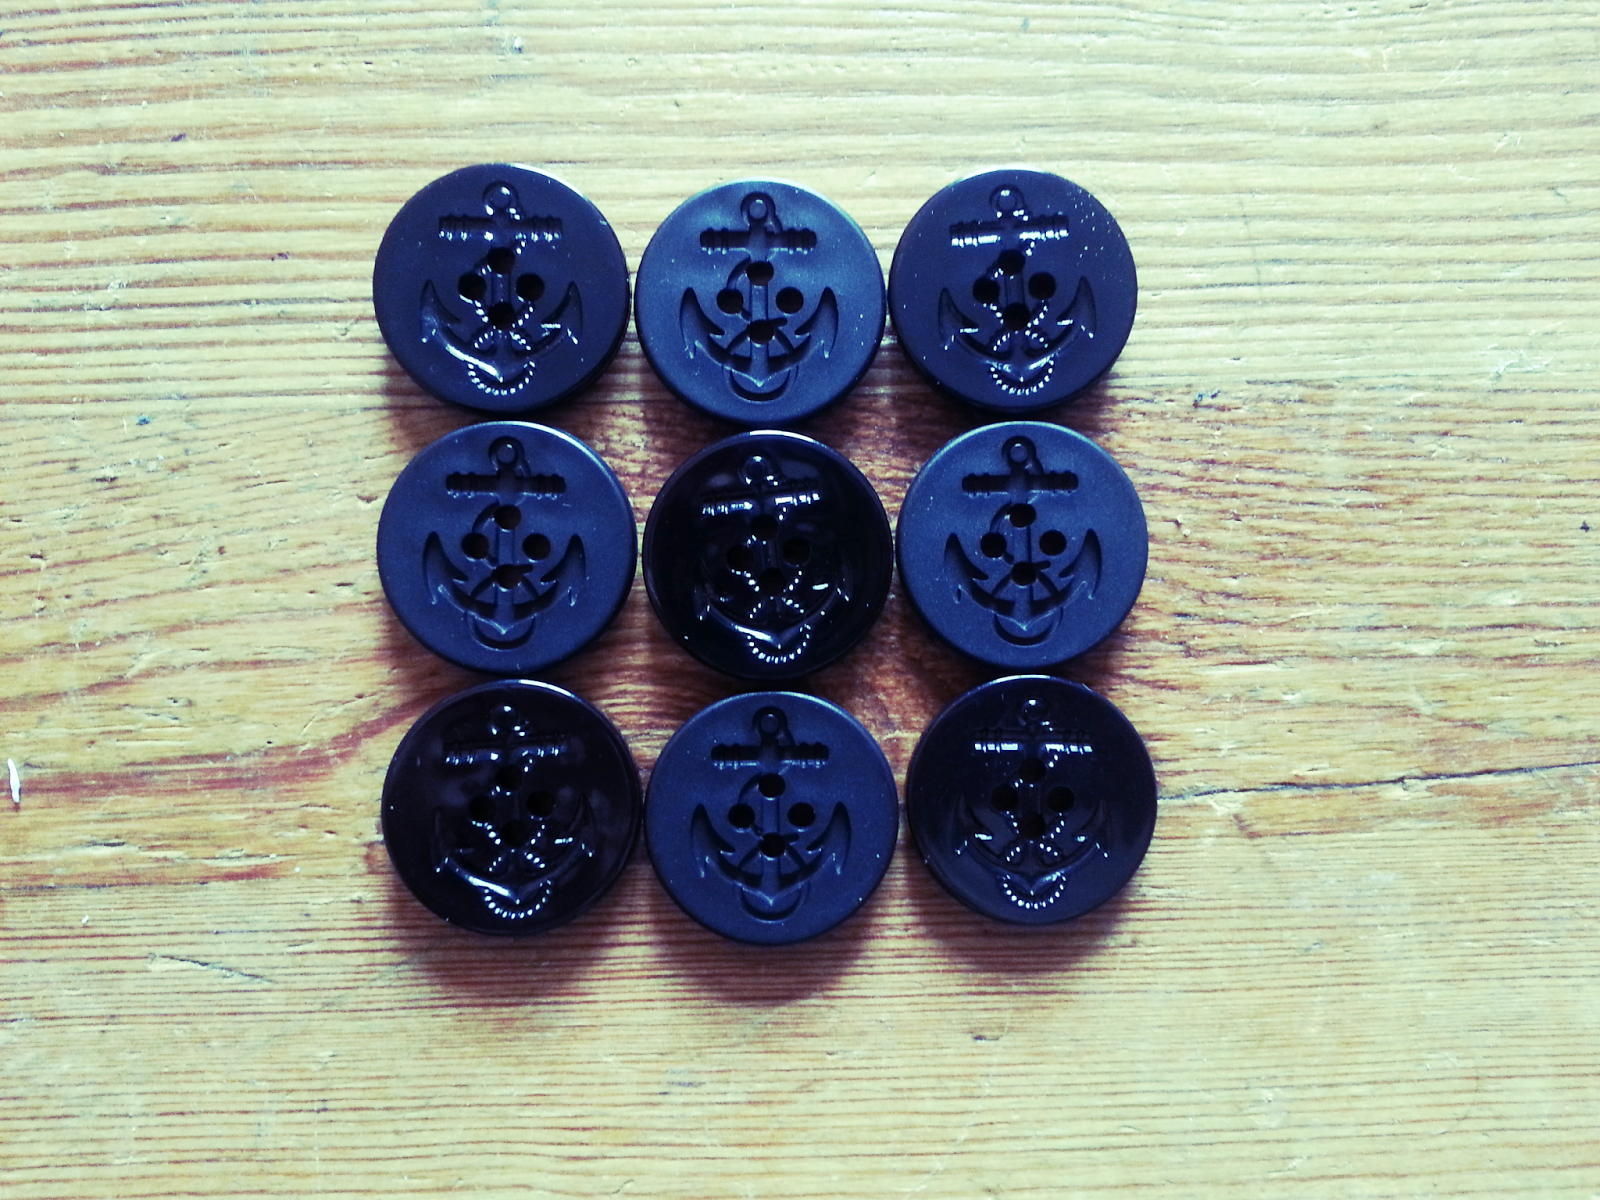
1. Nautical Anchor Buttons.  We settled on the matt ones for our McQueen coat.
2. Our founder now writes for Oxfam fashion!  Her first post about band t-shirts can be found here: http://goo.gl/PBpl96 
3. Love little touches like this from independent sellers.
4. Our Alexander McQueen inspired coat is finally finished! We used McCall's sewing pattern M6800.
5. Had to take a shot of the inside of our McQueen coat.  Just look at that gorgeous lining!
6. You can find all the details of our pattern match and pattern review for the McQueen coat here: http://goo.gl/iGCGfL
7. The Clash: taking part in 6 Music's Band T-shirt Day.
8. Three gorgeous necklaces from Sour Cherry.  Support your local businesses this Christmas :)
9. A little preview of our next tutorial. Can you guess what it is?
 
Come join us on Instagram: fashiontodiyfor or use the tag #fashionDIY so we can find your makes :)

Love,
F*2DIY4 x
@fashiontodiyfor #fashionDIY

Pattern Review/Match - McCalls M6800 Alexander McQueen inspired coat

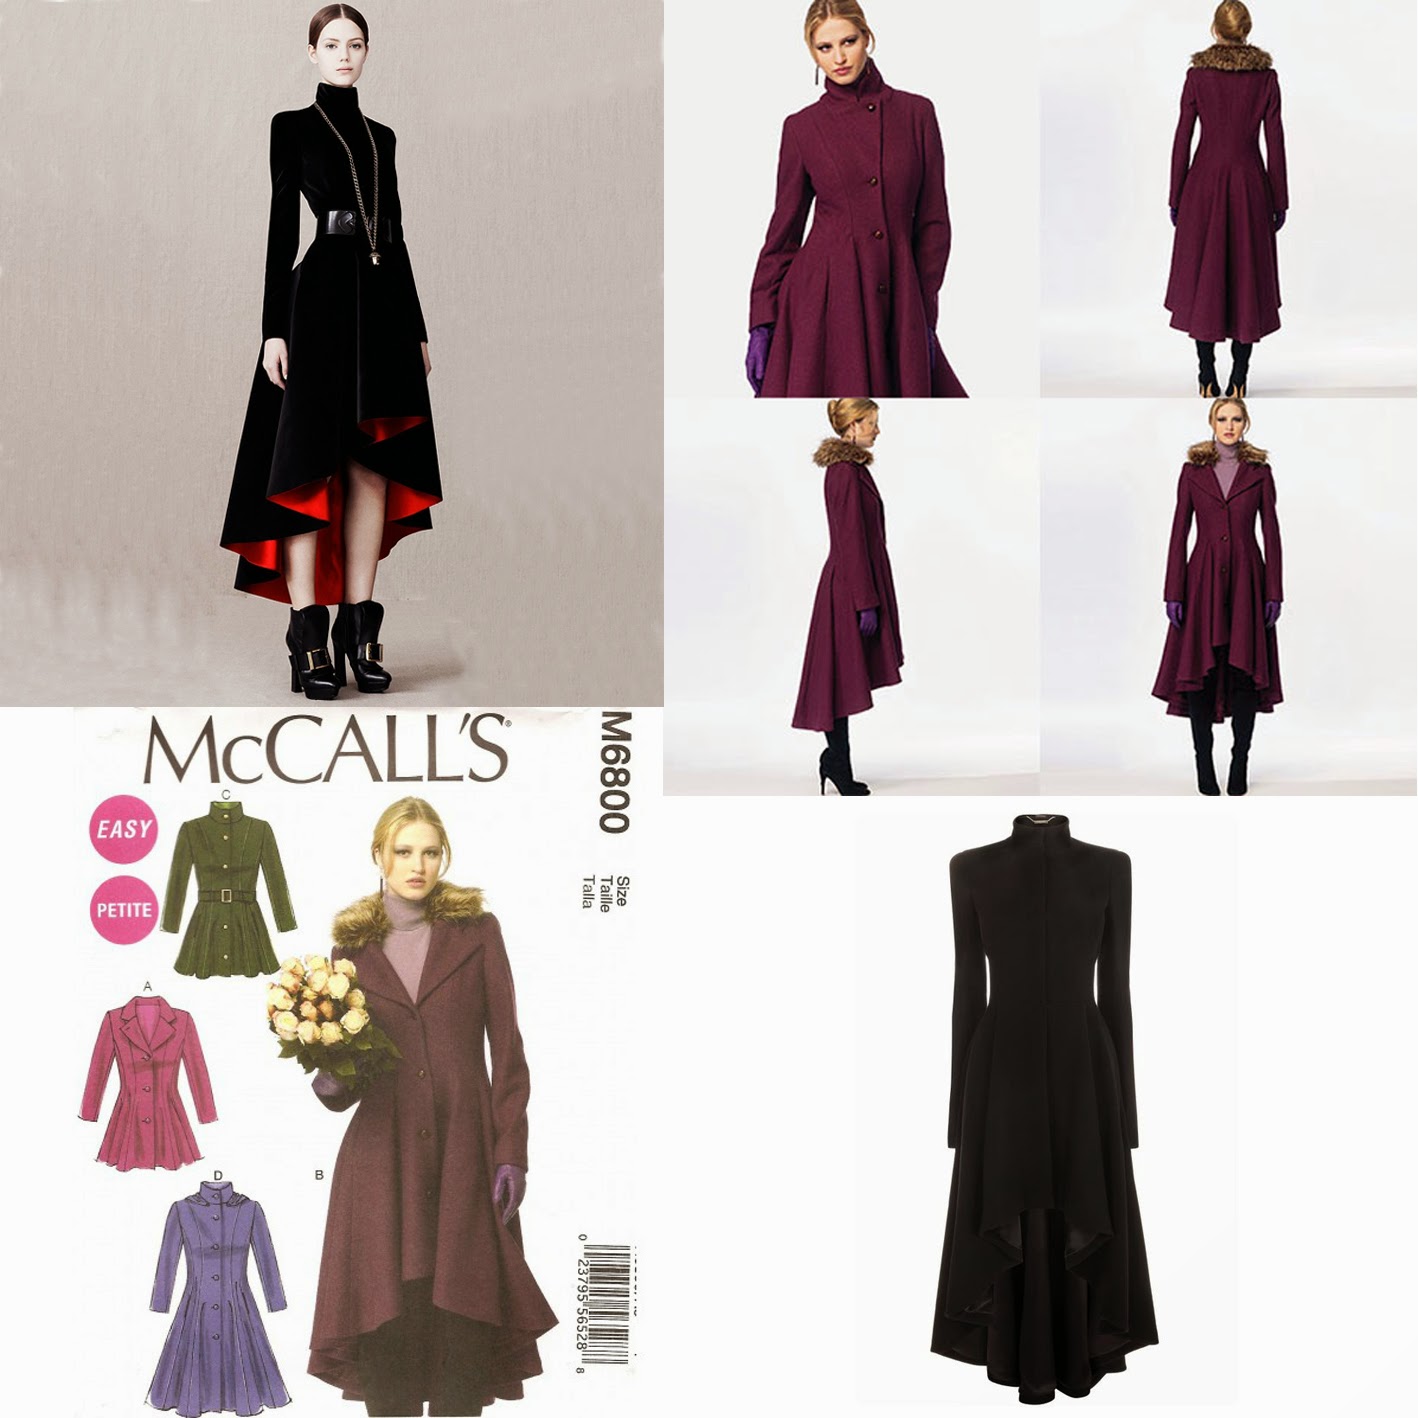
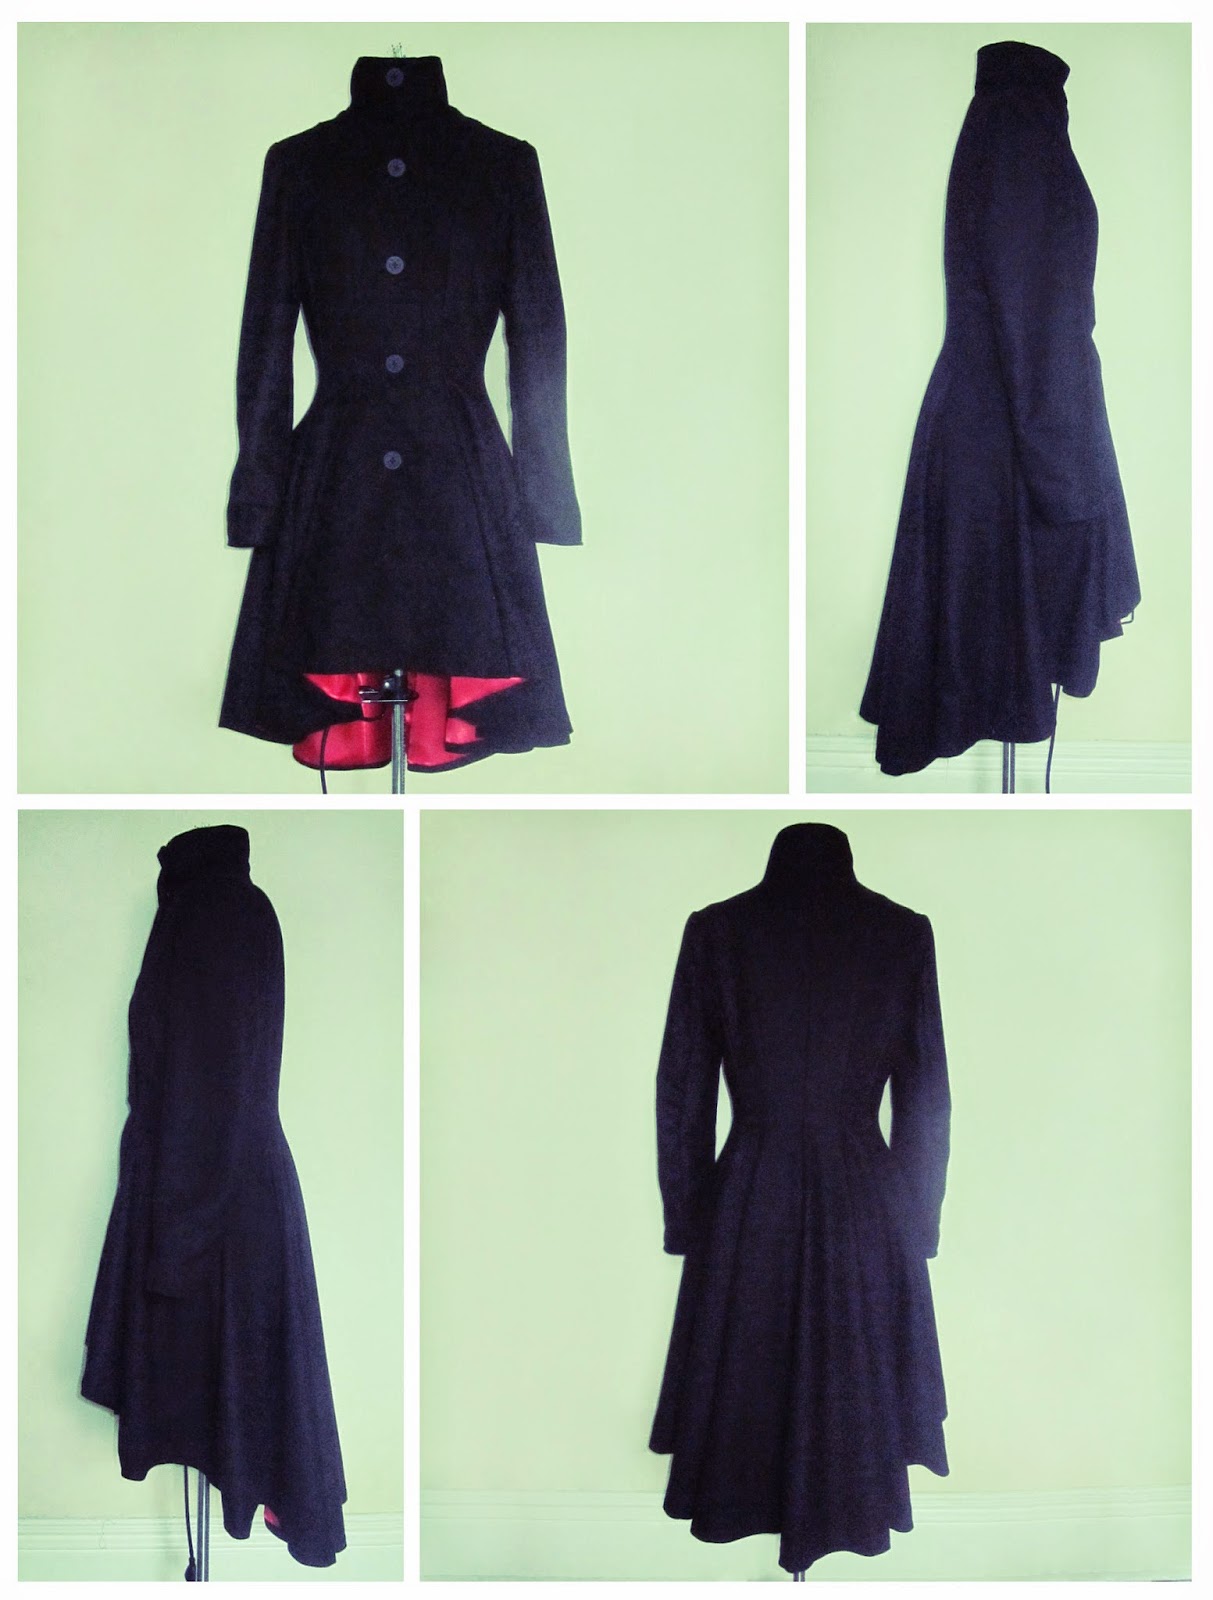
We've been lusting after the high-low hem Alexander McQueen coat for a long time and any of our regular followers will know that we found the perfect pattern match for it a few months ago! McCall's M6800 sewing pattern has the perfect hemline and collar shape to match the original McQueen style.


With winter setting in and the weather getting colder one of our seamstresses decided now was the perfect time to make our McQueen inspired coat:

The instructions were clear and easy to follow although I had to combine variation B for the hemline with variation C/D for the collar line so there was a little jumping around between sections.  I made this coat in a size larger than I would normally wear, to accommodate layers of clothing underneath.  I adore the shape of this coat, the fit and flare style is so flattering.  It may mean you need a lot of fabric to make it but it is totally worth it for the fullness of the skirt.


The only alteration I made was to add an extra hook and eye at the collar line to keep the opening flats.  The bulk of the fabric and facing at the collar seam was making it bulge out a little at times and this extra fastening just helps to keep everything flats and in place neatly.  Excuse the lint in this photo, the red lining fabric frayed easily and got everywhere, a quick run over with a lint brush soon got rid of this.


When I saw these nautical anchor buttons I just had to have them for this coat.  I decided on the matt ones in the end as they are more subtle and blend in with the fabric better.  Cute aren't they?


Overall, I am very impressed with the outcome of this make.  The fit of the coat is true to size and gives a lovely faltering shape.  I love the bright red lining against the black wool fabric and the hemline is sure to make you stand out!  I think this is the best pattern match from Fashion to DIY for yet, it's so close to the original Alexander McQueen coat.  I cannot wait to wear this out and about, what do you think?!

Pattern rating: 10/10 :)


There's more photos of the construction process over on Fashion to DIY for's Instagram page.  Don't forget to share your photos of any projects you're inspired to do or ask any questions.  You can contact us on here or on Twitter and Instagram using @fashiontodiyfor

Love
F*2DIY4 x
@fashiontodiyfor #fashionDIY

Instagram - October Round Up

October! We've mainly been busy with our Alexander McQueen inspired coat DIY but there's a few other things going on at the same time.  Check them out: 


From top left going across the rows:
1. Not a DIY but a funky little necklace we just had to share.
2. The start of our Tom Binns inspired DIY necklace.  We'll be blogging the finished project in the coming weeks.
3. The toile for out Alexander McQueen inspired winter coat DIY using McCall's M6800 sewing pattern.
4. Cutting out the fabric for out McQueen inspired M6800 coat DIY, it took 5 metres of fabric and a few hours of cutting!
5. The bold and beautiful lining fabric for our McQueen inspired M6800 coat.
6. Hair chalks, the non permanent way to DIY your hair.  A little messy to put in but well worth it if you can't commit to a permanent colour.
7. Charity Shop Haul, three new dresses for work for under £20. Yay.
8. The construction of our McQueen inspired winter coat.
9. Halfway through the DIY of our McQueen coat. What do you think so far?
 
Come join us on Instagram: fashiontodiyfor or use the tag #fashionDIY so we can find your makes :)

Love,
F*2DIY4 x
@fashiontodiyfor #fashionDIY