Showing posts with label Sewcialist. Show all posts

Pattern Review/Hack - McCalls M6893 Skull Lace Applique Dress

Now anyone that follows me on Instagram or Twitter would've seen my many posts about a bridesmaid dress I've been making.  The only remit for the dress was that it had to be black.  As the wedding was in October I decided that I wanted a long dress to suit our British weather.  And then, of course, I played with the idea of getting skulls into it to create an 'alternative' bridesmaid dress.  Not everyone's cup of tea I know, but I was thinking more Alexander McQueen style than teenage goth. 

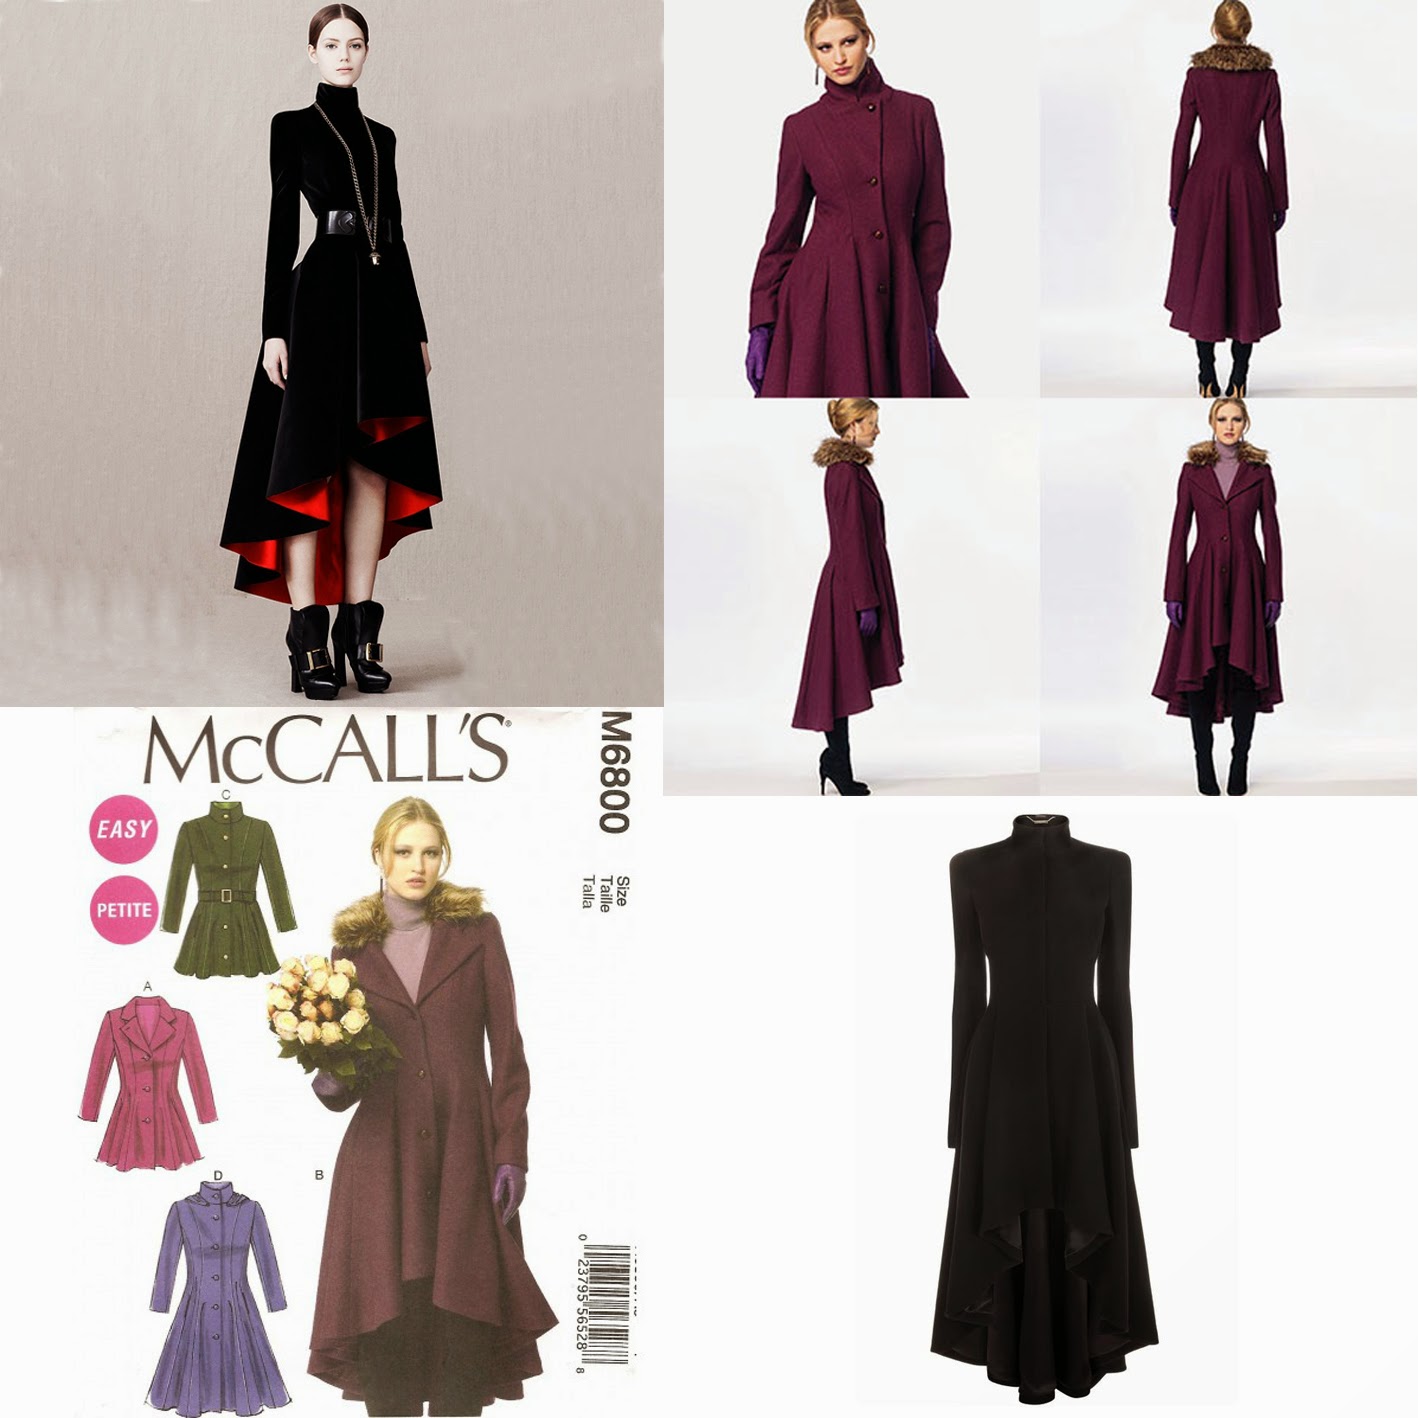
I decided to start with McCall's pattern M6893, using the long full skirt and bodice D for the elbow length sleeves. 


I also had a vague plan of a black skirt and a black lace top over a nude bodice but that was as far as my planning went. 

After searching around and failing to find some black lace that I really liked I decided to look into lace applique and opened a treasure trove of possibilities, there is so much out there!

I ordered an awful lot of lace applique pieces, my main choices were butterflies, flowers and yep skulls.  I also ordered some white lace appliques - like the two doves holding wedding rings  (how appropriate, right?) and dyed them black using Dylon's fabric dye for hand use in velvet black.  The instructions on the packet are super easy to use so don't be intimidated about dying your own fabric to suit your needs.

After knocking together a quick toile of the bodice piece I set about pinning the lace pieces to my mannequin to try and build up what sort of pattern I want.  This took me a long time, I'm talking weeks here, of putting some pieces on then leaving it to see how I felt about it after a couple of days.  I actually really enjoy this sort of thing, it's kind of like a puzzle trying to get all the pieces to fit together and also to follow the natural body shape.  The large skull piece on the back meant that I had to move the placement of the zip from the back to the side seam.


Then it was on to making the actual dress.  I made the bodice out of some nude satin fabric.  I ordered multiple samples to make sure I got just the right colour to suit my skin tone. 

I made the tulle overlay using double seams rather than a French seam and trimmed close to the stitching. Then I lined both top pieces up on my mannequin and pinned them together matching the bust darts and side seams.


I hand tacked every piece of applique in place onto just the tulle not the under bodice so that the top would have some movement.  Then started the long process of hand stitch each in place.  I wanted to do it by hand to make sure it was absolutely neat, stitching around the outer edge of each piece.


I even found some gorgeous lace ribbon with skulls in it to put around the bottom of each sleeve.  So pretty!  Once everything was sewn into place a trimmed away the excess tulle and any lose threads.


I had originally planned just to have a satin skirt, but with the tulle bodice I decided to add a tulle over lay skirt to bring the whole dress together.


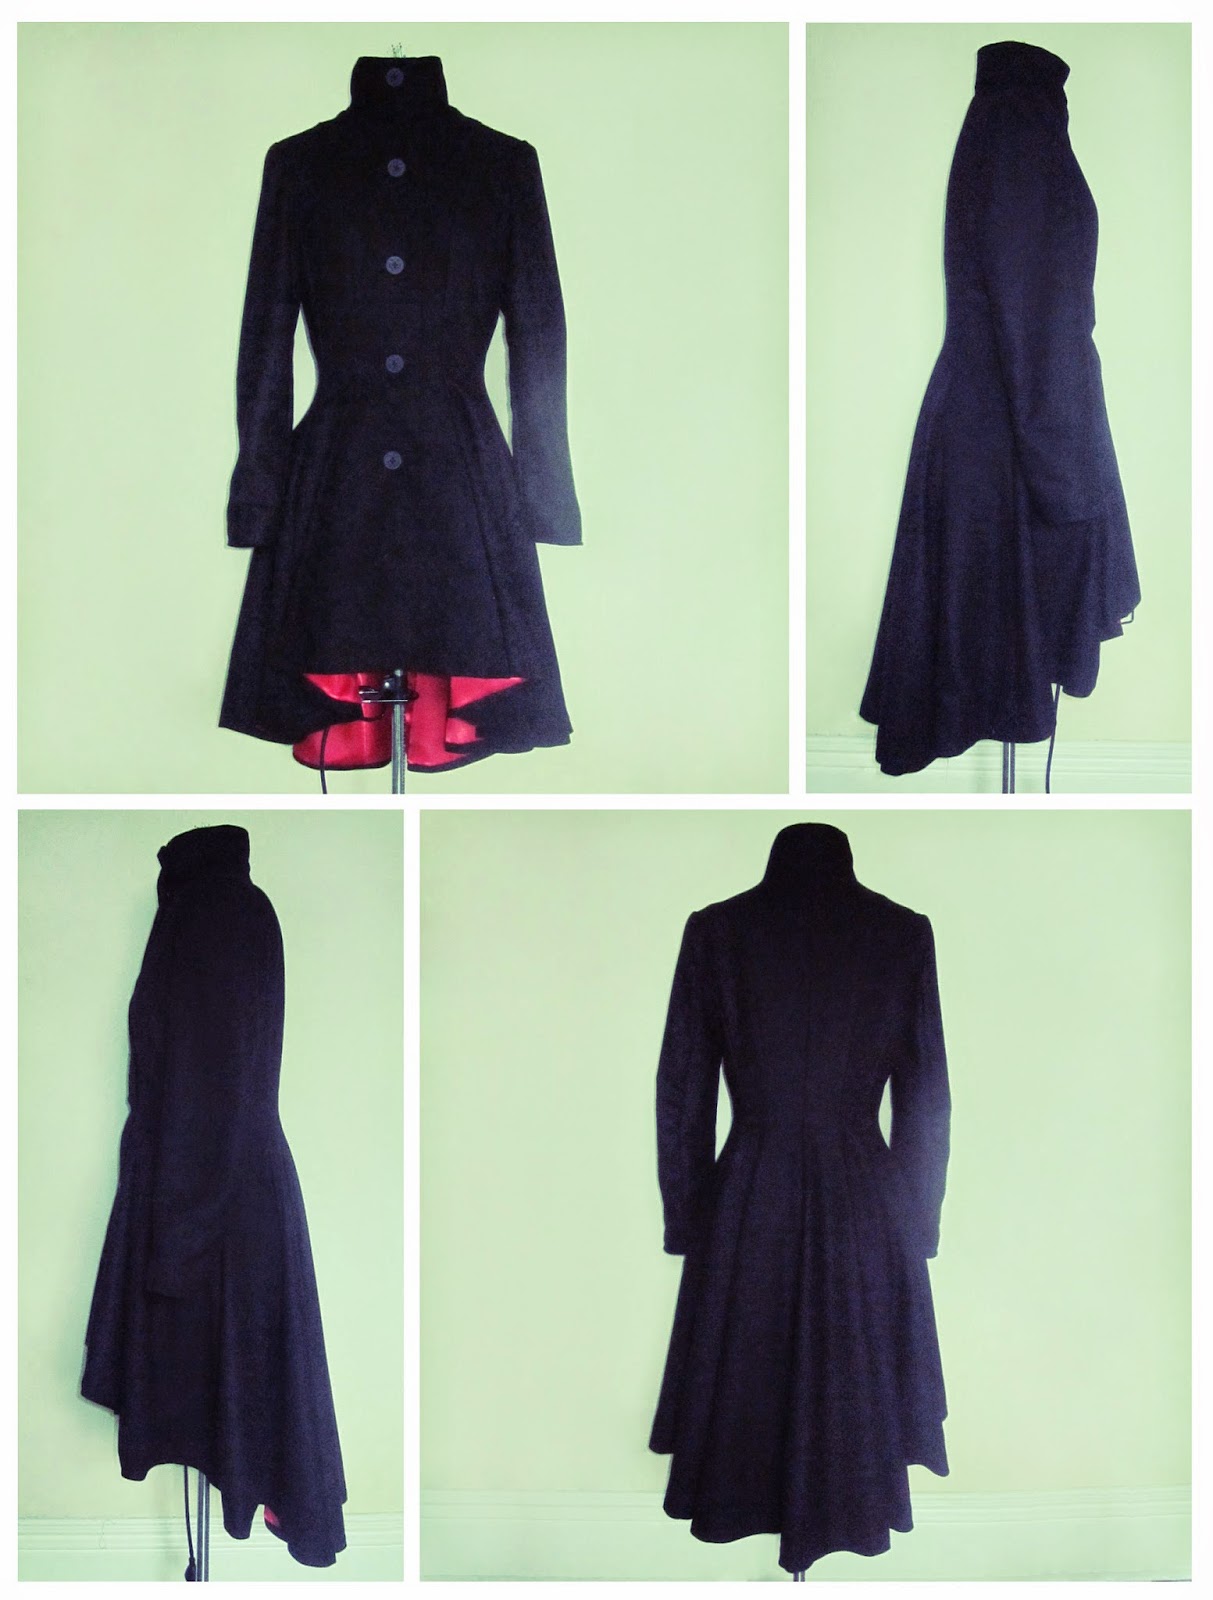
So the fully finished dress.  I don't have any good quality full length photos at the moment as trying to take good photos in winter light is impossible.  I'll update them when the weather is more co-operative! But you get the general idea.


This was probably the biggest project I've done so far and took me a good couple of months to get finished.  Has anyone else made a bridesmaid dress or used McCalls M6893 for a project?

Update: Got a couple of photos from the big day, gives you a proper idea of the final lace effect :)


Love F*2DIY4 x
@fashiontodiyfor #fashionDIY


Pattern Review/Hack - Amy Butler Bag

New year, New handbag.  You can never have too many handbags, in different colours, shapes, sizes, fabrics....  So why not sew your own?


This Amy Butler sewing pattern is available over on Sew Mama Sew and it's completely FREE! It even comes with two different strap lengths so you can decide which is best for you (or make both!?).

This pattern is well written and easy to follow. We made a couple of changes to the original design; we changed the shape of the flap to a curve, rather than the cut out shape of the pattern. This did mean we had to lower the 'tags' where the handles are sewn onto the bag to accommodate the new shape.

Secondly, instead of using 'Peltex' as the instructions call for, we improvised with super stiff interfacing. We used strong interfacing (as the pattern suggests) to line the majority of the pieces, but then instead of Peltex we used strong interfacing ironed onto pieces of cotton. This was far more cost effective and provides enough stability to shape the bag. To support the bottom we cut a piece of plastic and slid it in between the layers before attaching the lining to the outer bag.  You can just use a piece of cardboard for this if you don't have any suitable plastic to hand.

https://blogger.googleusercontent.com/img/b/R29vZ2xl/AVvXsEjymmnSx6Ni3Essw0asIqkLb8Nt-JiH5fzfgdwJC9NGnH4qRgUoaSOh0Utf83SBUUDaQB9Vrv8pYf4cxwQZ-VayCTtv4wAaj3Wu9czUhWWAB3cXcUxQEC9R_fLdjuk_37L0UI8uSZ1tQhXW/s1600/Aviary+Photo_130667718688968868.png


https://blogger.googleusercontent.com/img/b/R29vZ2xl/AVvXsEjtsHfZZKO-vgz9x3-nQ0Y8K1Hss9_qyOvXUP3xffBgQSKqQo1QtTtIeLK3wikaxtUba-cBW9u1qLj4LCgtkd-d2DKBkacXCLcSQyeJ1Q6J__9FbnWR5uCT-WmrT-aNJiqyO2aH0kaQzeNH/s1600/Aviary+Photo_130667730290217611.png
We chose to make the bag out of a faux suede fabric and to cover the bag flap in skull studs.  If you want to attach studs yourself its best to do this before you start sewing any of the pattern pieces together, just be sure to take the seam allowances into account when deciding on the layout of your studs.

We love the inside of this bag thanks to the bold contrasting neon yellow lining and the two divider pockets, one of which has a zips.  Compartments are key to a great bag and this pattern has it right.

You will need a needle that is able to cope with thick fabrics once all the layers are built up especially when attaching the flap to the main bag.  Also we decided to hand stich the final gathers in the side as it simply wouldn't fit under the sewing machine foot!

The possibilities of adapting this pattern make it essential to your fashion DIY collection.  Especially as it's free, you have nothing to lose!

We'd love to see any bags you've made yourself.

Love
F*2DIY4 x
@fashiontodiyfor #fashionDIY

Pattern Review/Match - McCalls M6800 Alexander McQueen inspired coat

We've been lusting after the high-low hem Alexander McQueen coat for a long time and any of our regular followers will know that we found the perfect pattern match for it a few months ago! McCall's M6800 sewing pattern has the perfect hemline and collar shape to match the original McQueen style.


With winter setting in and the weather getting colder one of our seamstresses decided now was the perfect time to make our McQueen inspired coat:

The instructions were clear and easy to follow although I had to combine variation B for the hemline with variation C/D for the collar line so there was a little jumping around between sections.  I made this coat in a size larger than I would normally wear, to accommodate layers of clothing underneath.  I adore the shape of this coat, the fit and flare style is so flattering.  It may mean you need a lot of fabric to make it but it is totally worth it for the fullness of the skirt.


The only alteration I made was to add an extra hook and eye at the collar line to keep the opening flats.  The bulk of the fabric and facing at the collar seam was making it bulge out a little at times and this extra fastening just helps to keep everything flats and in place neatly.  Excuse the lint in this photo, the red lining fabric frayed easily and got everywhere, a quick run over with a lint brush soon got rid of this.


When I saw these nautical anchor buttons I just had to have them for this coat.  I decided on the matt ones in the end as they are more subtle and blend in with the fabric better.  Cute aren't they?


Overall, I am very impressed with the outcome of this make.  The fit of the coat is true to size and gives a lovely faltering shape.  I love the bright red lining against the black wool fabric and the hemline is sure to make you stand out!  I think this is the best pattern match from Fashion to DIY for yet, it's so close to the original Alexander McQueen coat.  I cannot wait to wear this out and about, what do you think?!

Pattern rating: 10/10 :)


There's more photos of the construction process over on Fashion to DIY for's Instagram page.  Don't forget to share your photos of any projects you're inspired to do or ask any questions.  You can contact us on here or on Twitter and Instagram using @fashiontodiyfor

Love
F*2DIY4 x
@fashiontodiyfor #fashionDIY

Instagram - October Round Up

October! We've mainly been busy with our Alexander McQueen inspired coat DIY but there's a few other things going on at the same time.  Check them out: 


From top left going across the rows:
1. Not a DIY but a funky little necklace we just had to share.
2. The start of our Tom Binns inspired DIY necklace.  We'll be blogging the finished project in the coming weeks.
3. The toile for out Alexander McQueen inspired winter coat DIY using McCall's M6800 sewing pattern.
4. Cutting out the fabric for out McQueen inspired M6800 coat DIY, it took 5 metres of fabric and a few hours of cutting!
5. The bold and beautiful lining fabric for our McQueen inspired M6800 coat.
6. Hair chalks, the non permanent way to DIY your hair.  A little messy to put in but well worth it if you can't commit to a permanent colour.
7. Charity Shop Haul, three new dresses for work for under £20. Yay.
8. The construction of our McQueen inspired winter coat.
9. Halfway through the DIY of our McQueen coat. What do you think so far?
 
Come join us on Instagram: fashiontodiyfor or use the tag #fashionDIY so we can find your makes :)

Love,
F*2DIY4 x
@fashiontodiyfor #fashionDIY

Pattern Matching: Valentino Lace Dress

We adore these beautiful Valentino lace dresses (and there's many more in the range).  If you fancy making your own then we recommend Vogue V8766 dress pattern.  With the various sleeve lengths and different skirt options you can put together your own perfect lace dress.

Love,
 Fashion*2DIY4
@fashiontodiyfor #fashionDIY

Pattern Hack: Badgley Mischka Evening Gown for Vogue

When one of our team was invited to a black tie wedding we just had to take the opportunity to make a gorgeous gown.  Having decided on a fishtail/mermaid style dress we set about finding a suitable dress pattern.  None were quite perfect for the deign we had in mind so we settled for a Badgley Mischka for Vogue pattern (V1374) which we could use for a hack.
 
The most striking change we made was to remove the drape from the back  This was straight forward as it is its own separate piece so we just took this out of the pattern altogether.  We also cut the skirt of the pattern closer on the thighs down to the knees to give a more figure hugging shape and leave a more dramatic fishtail.  Finally we added small flutter sleeves rather than full length ones.

In general we followed the instructions which came with the pattern.  These are very clear and simple as the dress is made stretch fabric so no zips or fastenings are needed.  In the original pattern the main dress is made up of just two full length pieces (the front and the back) sewn together.  However, our fabric was not wide enough to accommodate the length of the dress so we simply cut the pattern pieces along the waist line to give us a front bodice, front skirt, back bodice and back skirt.  If you are doing this yourself be sure to add a seam allowance to your pieces where you are going to sew them together at the waist.  Finally we added a row of beads around the waist to accentuate the figure and also help cover that seam!


For the fabric we used a turquoise lace layered over a nude.  We tacked these two fabrics together and treated them as one when constructing the dress.  Although the finished dress is impressive it really was one of our most straightforward makes!

So, what do you think of our evening gown pattern hack?

Love
F*2DIY4 x
@fashiontodiyfor #fashionDIY

Tip 2: Toiles and Muslins

We thought we'd take a little break from tutorials, reviews and pattern matching to talk a little bit about the importance of toiles and muslins.  These two words (used interchangeably) strike dread into many a sewers heart, and have even lead to us putting off sewing projects just to avoid doing these. Just like tracing patterns from their original sheet, toiles and muslins are the "proper" way of doing things. A toile is a sort of test run of your pattern, a mock up of your final garment in a cheap fabric, allowing you to check the size and fit.
 
Although it seems like a long and boring process (well it does to us anyway especially as it's hard to get excited about a garment you're not actually going to wear) try to think of it as something that'll save you time in the long run. You don't want to spend hours working on your final garment only to find it doesn't fit. Also, crucially, it saves you from wasting the beautiful and probably more expensive fabric you bought for your final garment.
 
Another additional bonus of toiles and muslins is that making them gives you a trial run through your pattern. It forces you to actually read all the instructions before you start your final project (something we should all be doing but the excitement of a new pattern can mean we rush into sewing before checking all the instructing first). This gives you a heads up of what's to come; check seam allowances, see what stitches are used and which bits are particularly fiddly so will need extra care when using your hallowed 'real' fabric. The whole process will also give your a good idea about how long your actual run will take you (we're always underestimating how long projects will take).

So, bite the bullet and make that toile! It'll be worth it in the end. 

Oh and a little tip, if you're looking for some cheap fabric at short notice check out discount double duvet sets :)

Love,
F*2DIY4 x

Pattern Hack: By Hand London's 'Georgia' dress

We loved By Hand London's Georgia dress (our review can be found here). However, here at Fashion To DIY For we also love to adapt and 'hack' patterns to create beautiful and unique clothes from the depths of our imaginations. When we saw this pattern we knew it would be perfect for a dress we'd been planning for a while.

 
The most obvious change is the hemline. We added this flirty flounce along the hem using a general circle skirt rule. You'll need a donut of fabric, with the centre circle being the same as the circumference of the bottom of the skirt and the width being the depth you want your frill to be plus the seam and hem allowances.
 
We also adjusted the hemline to be slightly higher at the front than the back for a little more interest and shape.  You'll need to decide how long you want the dress to be at the centre front (cf) and how long you want it at the centre back (cb).  Then divide the difference between these two figures by half the circumference of your hemline.  This'll give you how much longer your skirt should get per cm around your dress.  Then you'll need to adjust your pattern pieces accordingly.  For example

Length of centre front = cf
Length of centre back = cb
Circumference of skirt = c

cb - cf / (c/2) = difference per cm of circumference (d)

Now you will need to mark your pattern pieces, starting with marking the length of the centre front on your pattern piece.  Measure the width of the pattern piece (w) and times this by the difference per cm that you calculated earlier.  This will give you how much lower the far side of the pattern piece should be compared to your centre front starting point.  Mark this on the pattern piece and mark the same point on the next pattern piece (the front side pattern piece as this is where they will be sewn together so need to match). Then measure the width of this piece and use the same formula (width of the pattern piece x d) to give you how much lower the other side of the pattern piece needs to be compared to this starting point.  Continue this process around the pattern pieces until you reach the centre back. This'll give you a straight diagonal line sloping down from the centre front to the centre back.  You can smooth the points out if you want but the flounce covers up the harshness of these lines.  All very technical!  Perhaps some diagrams would help?  Let us know if you want some.
 
The bow on the back is our favourite feature.  It's made from a rectangle of fabric which we pleated and slid through a loop we attached at the hemline when sewing on our flounce.  You'll need to hand stitch the top corners of the bow to the dress so that it holds its shape.
 
We felt that this dress was particularly suitable for piping (which we're obsessed with at the moment) as it helps to highlight it's sexy shape.  We'll be putting together a tutorial on piping soon if that's something that you're not too familiar with.
 
Finally, we topstitched the straps and around the neckline of the dress, just to give it a more professional and pulled together look. 
 
Note: We love tartan, as you will notice over our projects, but it is a lot of effort to work with.  No matter how frustrating it is it's always worth taking the extra time to make sure that you're pattern lines will match when sewn together.  Again, we'll put together a tutorial on how to match fabric patterns if that's something that'll be of use to you.  It's these small tips and finishing touches that will give you a more professional high end looking dress. 

We hope you love our pattern hack as much as we do.  If you're inspired to undertake your own pattern hack we would love to see the results!

Love F*2DIY4 x
@fashiontodiyfor #fashionDIY

Instagram - July Round Up

Here's a quick look at the highlights from our Instagram account for this month. Enjoy:


From top left going across the rows:
1. Tracing By Hand London 'Georgia' dress. Pattern tracing can seem time consuming and boring but it's very important: http://goo.gl/xTDlBr
2. Half way through the construction of the 'Georgia' dress.
3. Got a bit carried away ordering fabric samples for an evening gown. Follow our progress over the next couple of weeks!
4. Our finished Purple Polka Dot By Hand London 'Georgia' dress! See what we thought of the pattern in our Pattern Review feature: http://goo.gl/LyV8KH
5. Our quick and easy Kimono Cover Up. Make your own for the hot summer weather with our tutorial: http://goo.gl/bc90nM
6. From all of those fabric samples we've chosen to use turquoise lace with a nude underlay for our fishtail evening gown. Can't wait to share the project with you!
7. Our gorgeous Crystal Skull Bing Ring. We'll post a tutorial so you can make your own statement ring in the next week.
8. We love tartan! But patterned fabric can be a pain to work with. The best way to make sure your pattern will be symmetrical is to cut one piece and use that as the template for the second piece, matching the pattern of your fabric.
9. The first of two By Hand London 'Georgia' pattern dress hacks we're working on. This one includes piping, which is always a good idea :)

 
Come join us on Instagram: fashiontodiyfor or use the tag #fashionDIY so we can find your makes :)

Pattern Review: By Hand London 'Georgia' Dress


Note: We've used this By Hand London 'Georgia' dress pattern as a base to make this dress.  To find out what changes we made click on the image :)